
Here's my version of "Faux Stone Playhouse Wall" step-by-step:
I penciled in where I wanted the stones to be. I did a staggered joint pattern that was 12 inches high and 16 inches wide for each stone (the 3x4 ratio). I masked out the keystone area above the arches because I want to do a different treatment there.
 The next step was to paint along the grout lines that I had just drawn so that when I lifted the tape the joints would be perfectly painted. However, I realized two things: I should have used painter's tape because I accidentally lifted some paint trying to adjust a line and if you are going to do a base coat that is similar to the grout color this step is unnessary because you can undercoat the whole thing after you do the texture.
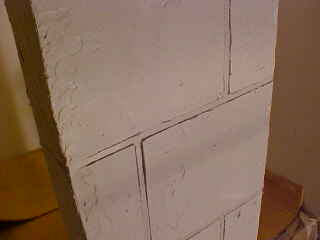
 So after I let the paint dry I taped out the grout lines with 1/4 inch tape. I immediately started gooping drywall mud onto the wall. The more random the better. I wanted a rough texture but not so rough that it would hurt someone's hands. If it started to get too smooth I would dab the huge putty knife flat into the mud to raise little harp points which I would knock down for the texture.
At this point you are just watching that you don't get it too thick in some areas and then leave bare spots near the grout lines. It's good to have bare spots in some places for depth but not near the grout lines.
 Don't let the mud dry once you have it the way you want it. Once you're done with the texturing, immediately remove the tape. One thing I wished I had at this point was a pair of scissors to clip off the tape at manageable lengths. Because I had overlapped the tape, too much came off at once. I did find that the masking tape came off easily because of the moisture of the mud. This part was exciting.
No comments:
Post a Comment