Friday, November 18, 2005

Scaling the Playhouse Wall - pt. 2

After letting the "stones" dry a few days the next step was to sand out any sharp edges that might hurt someone. Don't over sand or you will lose the character you tried to hard to create. I ran my hand over everything feeling for snags. I smoothed it most at the window.

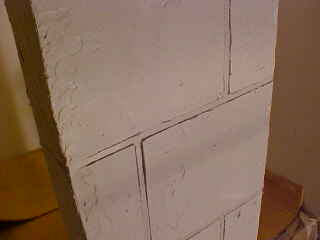
I watered down a dark brown with half water (you can use glaze medium) and went over the texture with a paint brush and rubbed with an old t-shirt. I probably could have used even less paint because it covered almost too well.

I concentrated the color on the edges of the stones and made it lighter in the middle. I was trying to pick up all the texture of the wall and have the paint color fall into the cracks. I made little crosshatches of full color on about 4 stones and then went back with the brush almost empty and blended the crosshatches and then I rubbed and tamped with the t-shirt to blend and feather.

After I was happy with that layer, I got some stain with poly and went over the whole thing. I thought it was going to be too dark but I liked it. It filled in most of the white areas left behind from the painting and made the stone more alive.

The last step was adding a bright gold color wherever there was any white left behind. I used a toothbrush and rubbed it off with a t-shirt but I would have used an artist's brush if I'd had one.

One thing I wished I had done is put in the yellow accents first before I did the stain layer because it dulled the stain when I wiped. I ended up doing two stain layers and could have probably done one.

The stain had poly in it and so it made the rocks look smooth and life-like. I also liked the way it shaded the grout lines and made the edges of the stone go almost black.

There will be a part 3 when I figure out the keystones. I've carved one from drywall and it looks pretty good but I may do a whole piece and carve it. I'm thrilled with the stone effect and will probably have to find a place to put it in our house.

Here's King Jeff enjoying the view from his castle window.

Scaling the Playhouse Wall - pt. 1

When the carpet layers had the temperature up to 80 degrees upstairs I was smothering so I decided to go downstairs in the basement and work on the playhouse.

Here's my version of "Faux Stone Playhouse Wall" step-by-step:

I penciled in where I wanted the stones to be. I did a staggered joint pattern that was 12 inches high and 16 inches wide for each stone (the 3x4 ratio). I masked out the keystone area above the arches because I want to do a different treatment there.

The next step was to paint along the grout lines that I had just drawn so that when I lifted the tape the joints would be perfectly painted. However, I realized two things: I should have used painter's tape because I accidentally lifted some paint trying to adjust a line and if you are going to do a base coat that is similar to the grout color this step is unnessary because you can undercoat the whole thing after you do the texture.


So after I let the paint dry I taped out the grout lines with 1/4 inch tape. I immediately started gooping drywall mud onto the wall. The more random the better. I wanted a rough texture but not so rough that it would hurt someone's hands. If it started to get too smooth I would dab the huge putty knife flat into the mud to raise little harp points which I would knock down for the texture.


At this point you are just watching that you don't get it too thick in some areas and then leave bare spots near the grout lines. It's good to have bare spots in some places for depth but not near the grout lines.


Don't let the mud dry once you have it the way you want it. Once you're done with the texturing, immediately remove the tape. One thing I wished I had at this point was a pair of scissors to clip off the tape at manageable lengths. Because I had overlapped the tape, too much came off at once. I did find that the masking tape came off easily because of the moisture of the mud. This part was exciting.

Thursday, November 17, 2005

The Carpet Angel Slays a Dragon

Other than our honeymoon in Cancun, I've never really been grateful for Jeff's ability with Spanish but when all the carpet layers were fresh from California and hardly spoke English he spent most of the morning acting as my intrepeter. We went back and forth discussing the color of the trim, what repairs needed to be done, etc. Thanks bubby.

We kept thinking that there was a "Chris" that Venice Flooring uses to install and that he supervised these guys. It took us until the next morning to figure out that "Angel" was the supervisor of his own crew. He looks a little like a gang banger and so we thought the older guy on the site was the site supervisor and he was just a worker and that Chris would show up any moment.

Anyway, Angel turned out to be a carpeting craftsman but those landing stairs (that I love) nearly did him in. He tried ever combination of folding and cutting...EVERYTHING. They had to come back the next morning.

I told them that when we tore out the carpeting it was in a bunch of pieces but Angel thought I was nuts. I'm ashamed to admit that I called David of Venice Flooring the next morning to see if he could help but he didn't know anything about carpet but he said that if Angel didn't pull through he'd call someone else.

I was a little afraid to come up and see but when I did...it was magical. Angel had figured out how to do it in one piece. I over-praised him in front of the other guys (I was very happy though...it looks great.) The older guy was so cute. He barely speaks english but he said "He is very smart. He's good, no?." I could only imagine the talk around the dinner table that night about the crazy white lady that wanted him to just piece it together and how he slew the stair dragon!

I ended up giving him an extra $50. He said it was too much but I told him again how happy I was with the stairs and the repairs he'd done (I'd already given him $100 for stretching the master and repairing the playhouse carpeting.)

Lesson Learned:

Craftsmen come in all different and tatooed packages. Dave's Construction has a big trailer, shirts & a website and did a lousy job.

The oldest guy in the truck isn't necessarily the supervisor.

Giving a good tip can make you feel good and really make a difference for struggling workmen. (Hopefully I'll get it back from Dave!)

Dave Arrrggghhh - Part Deux

Dave showed up the last day and put the laundry door in. He had some colonial style trim (not the smooth 70's type trim) and kept saying it was the good kind. I said that I wanted it to match and offered to go buy some. I went back in the house and told Jeff "I don't think he's going to trim out the hallway. He only had enough trim to do the door."

Jeff, being the good man that he is, went out to Dave and ask. Dave said he wasn't planning on doing the trim. A few minutes later Dave came in the house and offered to trade putting the sink in for putting up the trim. We went down in the basement together and he told me he needed 13 pieces.

Jeff and I went to Home Depot and cut 13 sections and brought them back. We left them on the patio and went to lunch. During lunch I got a call from Dave telling me that the MDF style we bought wasn't working and he couldn't "rip" it. Of course, we think he's trying to do trim work with a freakin' circular saw....but anyway, he refused to do the trimming.

Jeff insisted that I take him back home and so I had to confront Dave myself because over the phone he told me it was going to be $1257! This was about $600 dollars more than I had planned on...mind you...he already had $1500 of mine. I was already upset by the time I got there but when he started claiming that the drywall cost him $900 I lost it. I was crying hysterically as I was writing the check and told him I didn't expect it to be this much. I lost it again when I went downstairs and realized the wonderful door he'd installed won't even be able to open all the way because the dry is behind it....grrrr.

Long story short...I filed a small claims Tuesday for $464.00 (about $535 with court fees) When I got home and started using HIS numbers to figure out what he had REALLY done (and I was being generous) he had overcharged me considerably.

Of course, we've exchanged a few emails and he's not budging and hasn't sent me a copy of the drywaller's bill so I guess he's just expecting me to roll over. I guess he'll get a surprise soon.

Court won't happen until January 6th, however so the money might as well be gone.

Contractors have it sweet because they can slap a lien on you if you don't pay but you have to wait a month to get them to court.

Lesson Learned:

Don't ever let contractors offer you a verbal change to the work order. Put everything in writing and make sure you get a copy. I still don't have copies of anything I signed for him.

Don't believe someone when they say they will adjust something down...it ain't going to happen. They get greedy.

If a contractor walks on the job the first day and tries to "up the bid" by saying he wasn't expecting this or that...tell him to leave and get another contractor. Dave actually told me in the last few minutes before leaving "I don't even do plumbing." Then why did you put it on the bid?

May They Rest in Peace - the saga of the doors

Ah, Yes...the doors, I remember them well. I fantasized about the prospective buyers walking through the door and seeing the wonderful 6-panel doors and exclaiming "Why, (gasp) they've updated EVERYTHING!" (stand still for moment in amazement.) But it was not meant to be apparently. The doors have left the building....I repeat! The doors have left the building.

After hauling them onto a cart (with great effort) stacking them in the car (with great effort) hiring my sons to help me haul them into the condo (with great effort) we discovered that they don't fit EXACTLY and would have to be custom fit (did I mention GREAT EFFORT!!!!!) at about $100 per door or hours and hours (times four of course) of work on our part. I about broke down when I had to give up my doors. So guess what took me two trips to two home improvment stores? Oh, yeah. I forgot about the one that had a dent and I had to exchange...that one went back too. Did I mention I almost had another nervous breakdown?

Anyway, my mom helped me paint the orphan doors that I had luckily saved on the patio. She still has wisps of white on the tips of her hair. Maybe they'll be gone by Thanksgiving. Actually they look pretty good (the doors, not the wisps) and should go in rather easily. (Knock on Luan).

Lesson Learned:

Save things from the home that aren't in bad condition in case you run out of money. Things like towel bars, heat vents, lights and things like that might come in handy when the money is running out.

Behr paint must be good because it's stayed in Mom's hair through several washings.