Tuesday, April 11, 2006
Monday, April 10, 2006
OPEN, OPEN, OPEN...
We finally set a deadline and had an open house on Saturday. On the Wednesday before I took all the kids up there to clean the stuff out of the basement and then we loaded some of it out on the truck. I had Emma and Josh deliver the 1/2 page invites to Three Fountain residents. Unfortunately a freakish 6 inches of snow had fallen on the bench and Emma, bless her heart, ended up calf-deep in slush. What was even stranger is the 70 degree weather we had for the open house just 2 days later!
The response to the condition of the home was great. I had several people comment on the brown/leather wall and ask how I did it. Only about 3 people directly said they knew someone who might be interested but my stragedy was to get people in that neighbhorhood to hunt for their own neighbor.
No one was too thrilled with the price I set at $158,000 but almost everyone said I wouldn't have a problem selling it. The unit next door is only $148,500 and hasn't sold yet so I don't think price is the sticking point. I guess the market will make or break me.
We only have a $10,000 margin at $158,000 so if I have to start paying realtors or reducing the price I won't have made any money. It is a delicate balance.
There are three things that effect the sale of real estate. Location, Condition & Price. From the response condition won't be a problem. Location is good; the east bench of Provo and near the Riverwoods shopping center but it's still quiet. The last is price and that may be what kills me. So many people have undersold their units that they really aren't up to market. In Orem the same size home is about 185,000.
Next post will be the pictures I took. I haven't taken daytime pictures yet but these will give you a good idea of the finished product.
Lessons Learned:
Advertise heavily in the neighborhood when trying to sell a home. People who live there usually love a neighborhood and can convince a friend or family member better than you ever can.
Price is everything. Even a home in a horrible neighborhood can sell if it is priced low. If you want top dollar, though, your condition has to be above average "model" style.
Older people would rather have a bifold than a curtain. I love the curtain I installed on the pantry but I had 6 people ask where the door was. Grrr.
Sunday, April 02, 2006
Anyone got a little dutch boy?
And I don't mean the paint.
I put a hole in a copper water pipe. What is even worse is that the whole wall behind that same water pipe was exposed so I had no excuse to put a screw through it.
My only rationale is my own vanity. I wanted the screws to look even. EVEN THOUGH the screw I had just put in BARELY missed the pipe the first time I HAD to put the next screw directly parallel to that one. Boy I have a good eye; but boy, my brain shut off.
I was trying to hit the stud but the plumber had notched out an opening in the stud for the pipe to travel through. When my drilling felt weird I went to the back and saw no signs of drill bit so I thought I must have hit the stud and because I couldn't see anything.
When I backed out the screw to make another go...sprishshsplashspray....well, you get the idea. Remembering my first aid (never remove an object embedded in a person...let the hospital kill them,) I screwed the screw back in to stop the flow and shut off the main.
Took Jeff and I almost 2 hours to fix it. We had to melt a weld, cut through the pipe on the other side, put in a new section, re-weld and weld the new section in. Of course the new weld at the cut didn't work because of water in the pipes (I didn't want Jeff to do his bread trick because I didn't think it would make it past the sink supply lines.) The water cooled the weld too much.
I tried to blow the water back up the pipe and it ended up sending about a cup of water back out at me. Luckily I was "smart" enough to have turn off the 220 Volt dryer outlet before we started. We ended up blowing a chunk of bread up the pipe and that seemed to stem the water flow enough to make the weld.
I'm thinking of making a necklace out of my little section of pipe.
Lesson's Learned:
You can't weld pipe with water in it. The bread trick works and it even made it past 3/8ths supply lines (I did remove the faucet screen though.)
You might want to cut a peep hole when installing a vanity or cabinet mirror behind a sink in the basement. There WILL be supply/drainage pipes SOMEWHERE!
Know where your water main shut-off is even if you think you won't need it.
When crowsfeet are a good thing
The last bedroom is done. It is definately the most "lipstick on a pig" room. The construction in that room was almost as bad as the hallway and in some ways I might have saved time just ripping out these walls as well.
I did end up scraping the cottage-cheese acoustical texture off and it left behind tracks of mud and under that I could see the same crappy seams that were on the wall. Cottage cheese is for lazy-assed builders who don't want to make a good ceiling. Anyway...
At first I tried to texture like we did at home with small globs applied and then troweled but it was killing me. It's probably the most time intensive way.
Jeff had suggested we try the crows feet brush that we saw at Lowe's. I told him that it was used for ceilings and he thought it would be a good idea. I ended up sanding down the texture I had started and got out a paint tray liner and filled it with mud, put the brush at the end of a handle and stamped the brush into the mud.
I randomly mushed the pattern, twisting the brush around to different angles. If I got too much mud on the first tamp then I would go back over it again to lift off some of the mud. About half way through I had to wash out the brush because I stopped getting a sunburst and started getting sploosh. I just swished it around in a clean toilet and flush a few times.
After you apply the mud you have to wait about 5-10 mins to knock down the texture or you will just drag the mud across and ruin the pattern. Don't wait too long or you will drag lines in the mud. I used a 10 inch mud knife for the knock down.
I love the pattern and will probably use it in my bedroom over a very dark color. After it dries I'll probably "dye" it with a glaze so I don't cover up the dark paint underneath.
This is one of the few things that makes me glad we did the remodel. I love finding new and wonderful ways of doing things.
Lessons Learned:
Spending $8 for a crowsfoot brush saved me about 2 hours of time
Sometimes, very rarely, Jeff is right! :P
Remember that little 1/4 inch?
The 1/4 inch that put me under when I was putting in the beadboard backsplash? Well it has come back to haunt me. Yesterday I went to open the lovely drawer for the work table in the basement and it hit the trim. Another one of Dave's Construction "a contractor should know better" moments"..shouldn't a contractor know that he needed to leave space for the drawer to clear the door frame? Grrrr. Well, now our choices are to leave it be (drawer opening about 8 inches) or move the whole cabinet over 1/2 inch (and redoing the trim and adding a spacer).
Luckily I'm way past nervous breakdowns. My eyes are glassing over now...I believe it's called catatonic.
It looked so good too. I had put in the flooring at the base covering up the cement. I'm even starting to like the daffodile pattern that came as a total surprise (didn't show through the little window of the Armstrong box...I could have sworn I looked at the pattern. I must have been too busy beating people off at the Lowe's sidewalk sale.) But everything was so nice and then CLUNK.
Jeff and I will probably move the whole cabinet over and just adjust the trim. It really won't be that big of a deal; at least not compared to what we've been through but I'm tired and scared.
It's ironic that the better the place looks the worse it looks in my eyes. This must be what it is like for an anorexic. The skinner they get the fatter they seem to themselves. Now I start to notice little things. I have to stop myself from desiring perfection.
I looked at the before pictures again tonight. Sometimes you just need a reminder of how far you've come.
Lessons Learned:
Don't hire Dave's Construction (just a reminder for those that haven't read the whole blog.)
Make sure your drawers, doors & cupboards clear obstructions.
NO means on...
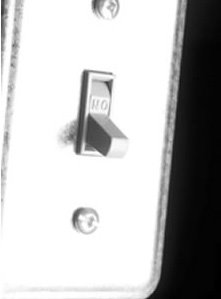
"It won't be that bad. They'll see "NO" and know that it means "ON"...right?" Oh, the rationalizations we make. A couple of weeks ago I had a mountain out of a molehill moment. I went to turn on a light switch that I had been working on and realized that I had put it in upside down. Now mind you, I had just spent 2 hours over two days figuring out an end-of-line 3-way switch (the hardest kind apparently...the book said 'this usually isn't done this way because it is so difficult to diagnose'...ya think?) right next to it and it was such a small thing. So why did it make me so depressed? I tried to tell myself that people will figure it out when they go to flip the switch but then my common sense told me that it will only take 10 mins to go turn off the circuit, unscrew the face plate, unscrew the switch and flip it. No big deal.
But it's those 10 minutes here and there that have made this 6 week makeover take 6 months.
Lesson Learned:
The power for two 3-way switches that come at the end of the line needs to go clear to the end switch then come back. If not you will shut power off and never figure out the secret combination of on and off.
When your switch says NO listen to it.
Subscribe to:
Posts (Atom)